


Well after months of hard work and many sleepless nights – Silvia is finally done!

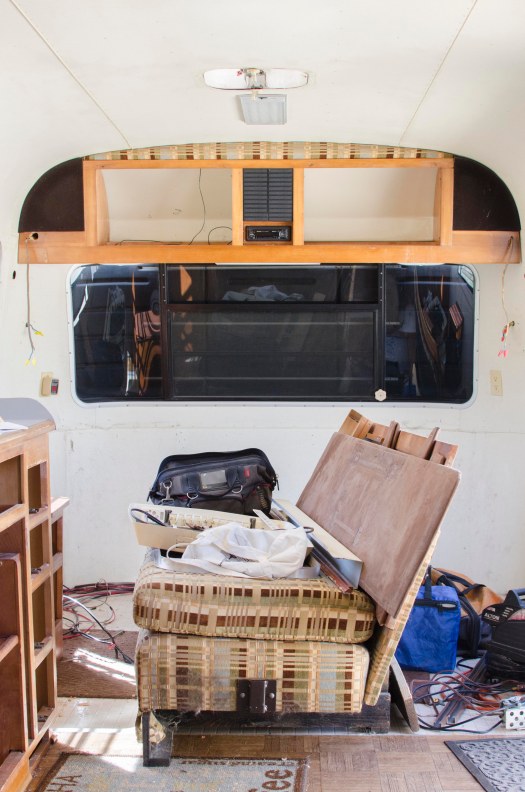
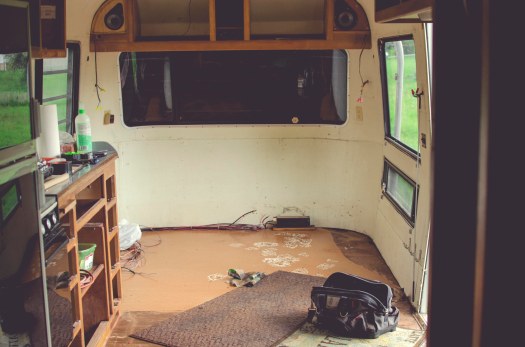
When we first got her she was in need of some serious updates. She needed to be brightened up…a lot. What a transformation she has been through.
The vision for my design was to find my own style which consists of: industrial + vintage + boho + eclectic + Native American. A strong Masculine foundation with Feminine touches.

| the finished Front |


| the finished Back |

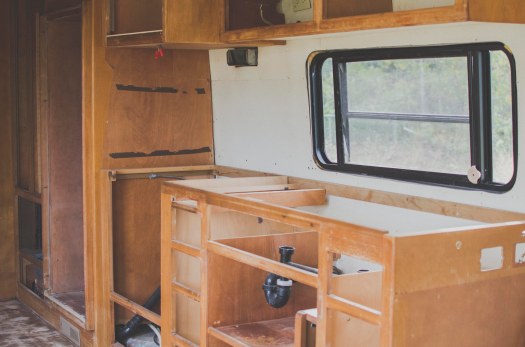
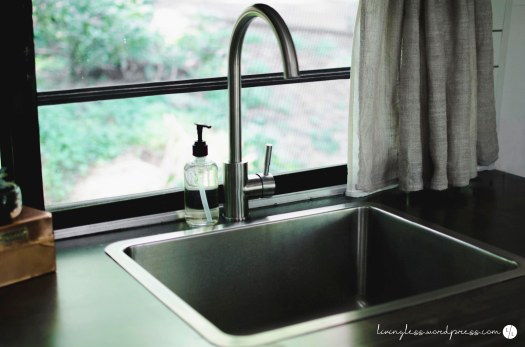
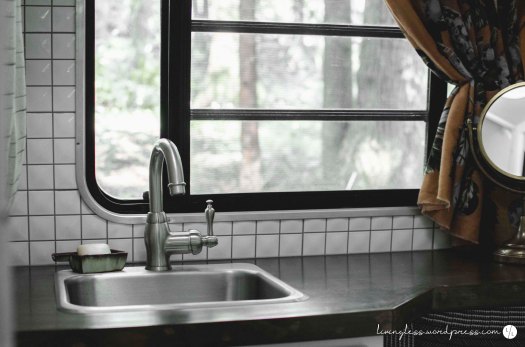
| The Kitchen |
This area underwent major renovations, including: a new counter – new sink – new faucet – new tile – new lighting – and powdered coated the Stove and Hood to give it a new color.

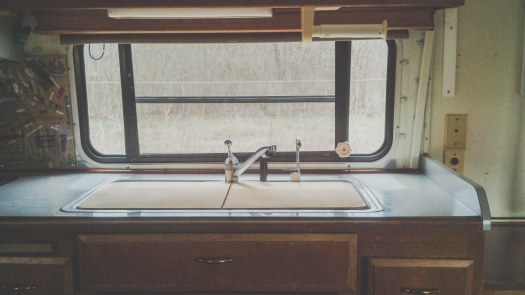
| the finished Kitchen |


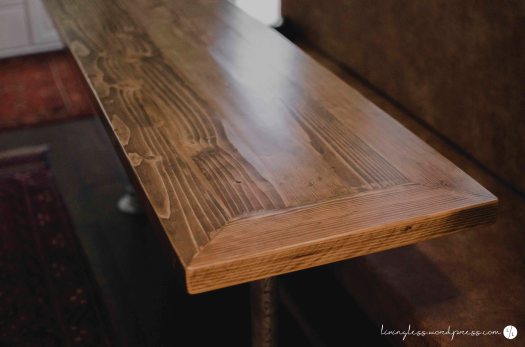
| The Dining Room |
Overall, this area got a brand new layout. Our goal was to open this space up as much as possible – while still being realistic to our needs. Travis made the tabletop, configured the layout of the table legs and made the bench. We purchased the fabric and had the cushions upholstered. And we bought Leonard – our Jackalope.


| the finished Dining Room |


| The Hallway |
Nothing was changed in this area. Silvia was constructed with good bones. All of the cabinetry is made of solid wood with dove tailed drawers. Paint was all it needed! We added a privacy curtain and a pocket door to close off the kiddos bedroom. The Electrical Panel was moved to a new location which freed up some well needed storage space. Luckily we had spare drawers and cabinet doors to make it appear original.


| the finished Hallway |


| The Kiddos Room |
Paint + Light Fixtures + new Mattresses + new Night Stand top + new Curtains
That was it! Pretty simple but they sure love it!


| the finished Kiddos Room |


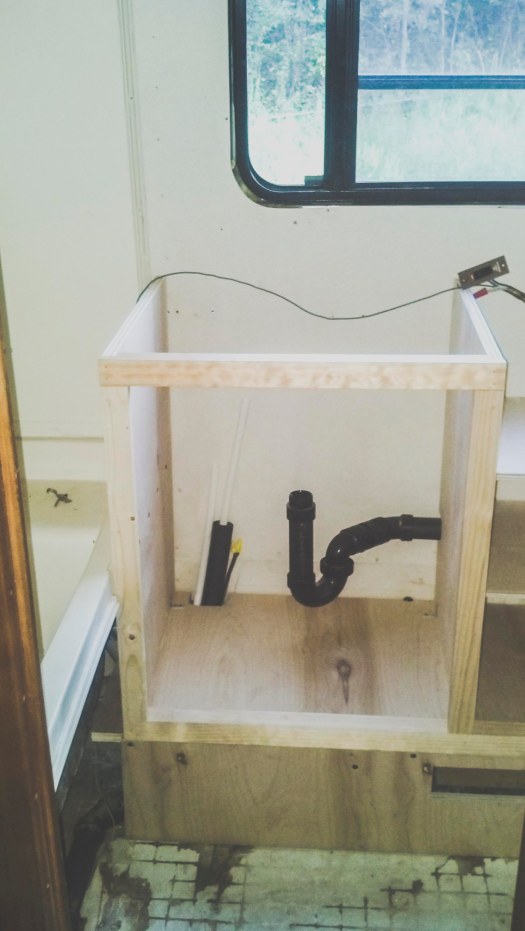
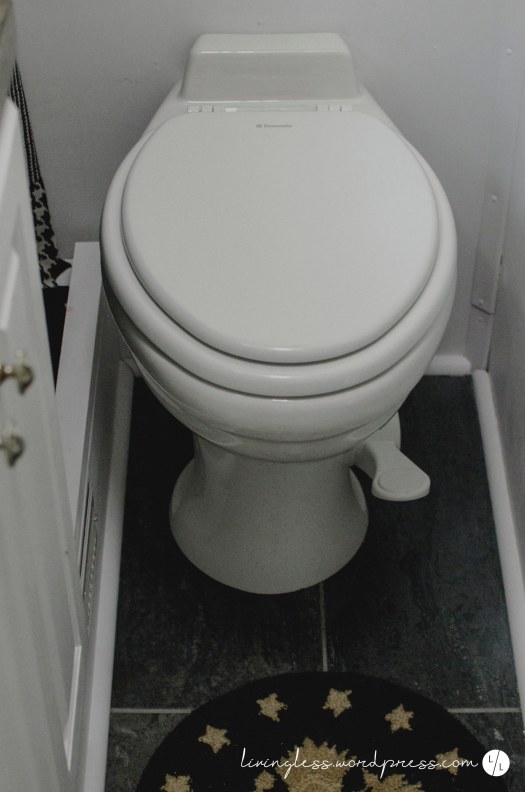
| The Bathroom |
The Bathroom had the most work. Funny because it is the smallest area in the trailer! It is so small I could not photograph it well. I had to shove myself in our closet to get the majority of the shots! The renovations here were: a new sink – new faucet – new tile on the back splash and the floor – new lighting – new toilet – new shower fixture – newly painted shower – and a custom built vanity & counter done by Travis.


| the finished Bathroom |


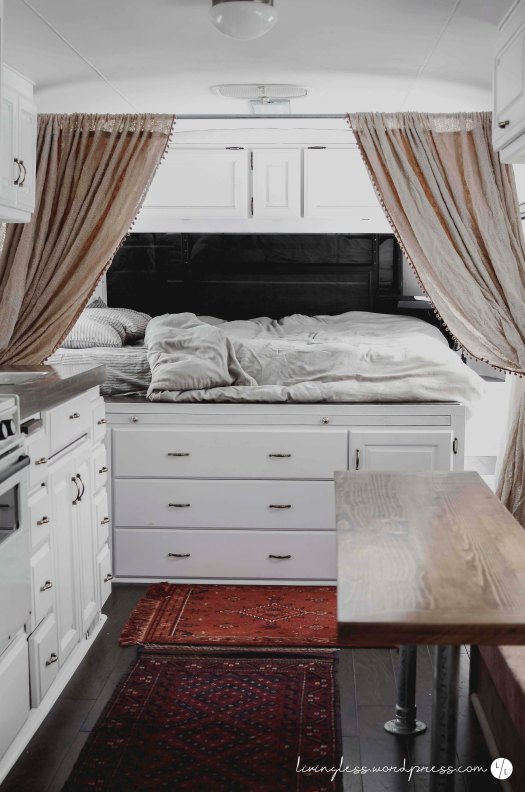
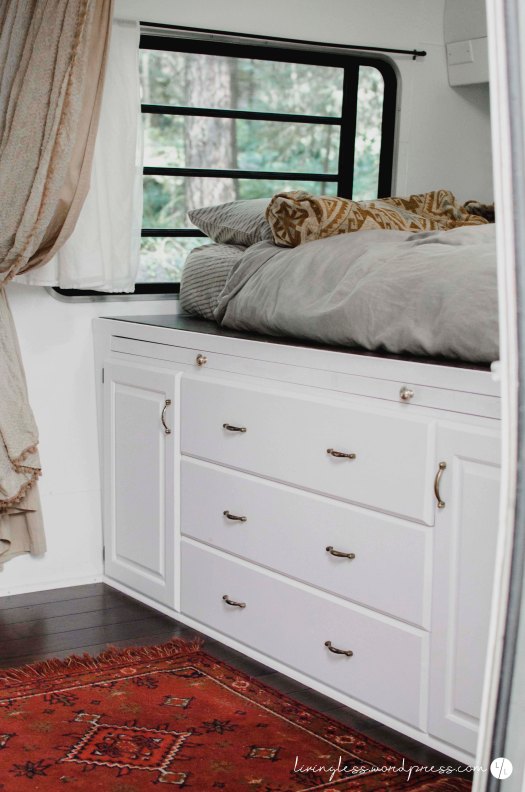
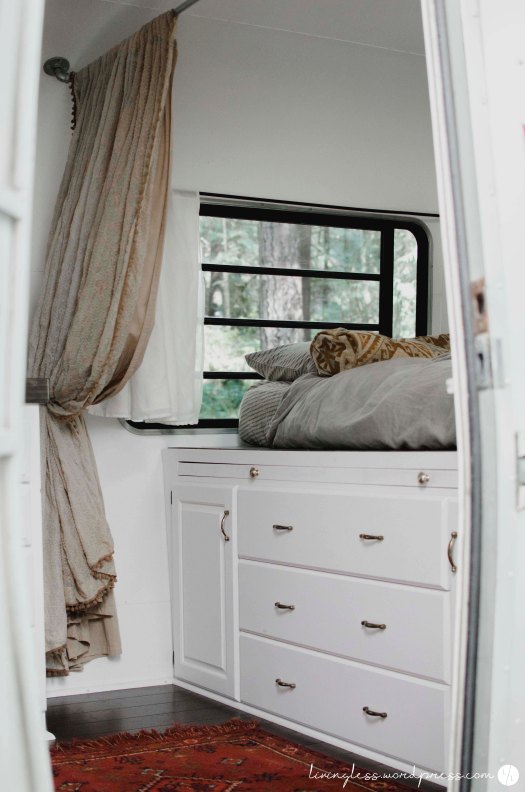
| The Master Bed |
As you will see from the photos, originally Silvia had a front living area with a couch and chair. For our family of 4 – that simply wouldn’t work for us. So a new concept unfolded and when it was all finished, we ended up with a pretty nice setup.
The bed + side step was constructed by Travis. We had a cabinet maker do the door faces and the 3 drawers – but Travis did everything else! We had leftover flooring – so I had Travis add it to the step and the top of our bed. My mom helped reupholster the fabric paneling on the top cabinets and do the dividing curtains to close off our area.

| the finished Master Bed |


| the finishing touches |


| our family |

Thanks for stopping by,
Niki

Love the renovations you did. I’m currently working on renovations myself. I was super curious about where you got your beige pom pom curtains at.
LikeLike
Hi Christina! Thank you for your compliment:) The curtains were somewhat DIY. I found the lace curtains at a thrift store and the pom poms were added to them. It was really simple and a very inexpensive.
LikeLike
How did you prep the shower to paint it and what type of paint did you use?
LikeLike
Hi Rhonda:)
We used the “Tough as Tile” spray but in the end we were not very happy with the end result. While moving the trailer one day, something fell into the shower and just like that, put a chip in the new paint! So, FYI – the “Tough as Tile” is not “Tough as Tile.”
LikeLike
Hi,
Great work! How did you prep the walls for paint and what paint did you use on the walls. I ran into issues with paint peeling.
LikeLike
Thanks for the fantastic post of a great renovation. I may be doing an Avion soon also. Yours looks great!
LikeLike
Thank you Gene!
LikeLike
Is there a recording on YouTube?
LikeLike
Absolutely amazing. Love everything you did. You have a beautiful camper to go with your beautiful family.
Enjoy your travels now, you deserve it.
Thanks so much for sharing. ..Brenda
LikeLike
You are so sweet! Thank you, Brenda:)
LikeLike
Very well done remodel!! I really like the high bed with storage below! Enjoy your adventures!
LikeLike
Thanks Benita!!!
LikeLike
I love it you did a wonderful job
LikeLike
Thank you Rosa:)
LikeLike
I adore how you did the master bed with the drawers! Did you creatr the concept yourselves or use a prepared set of plans?
LikeLike
Thanks Nakita! Actually my amazing, very talented husband, Travis, designed it himself:)
LikeLike
Love the bed and dresser idea. Beautiful remodel.
LikeLike
Why thank you, Marcia:)
LikeLike
Beautiful! We just renovated a 78 Avion, and I am searching for a rug for that tiny bathroom. Where did you find a rug that small?
LikeLike
Carrie, I actually bought that at an antique store! I could not believe how perfect it was! Wish I could help you out, but it’s really just luck…
LikeLike
Great job!! Blown away by the transformation!!
LikeLike
Thanks so much, Paul!
LikeLike
Absolutely love the renovation and color schemes! What size bed is the master? We are looking at doing this in ours as well with an added doggie den below. Ours is a 1973 Sovereign. Thank you in advance!
LikeLike
Hi Deandra! Thanks for your kind comment:) So, the mattress started out as a Queen…but after cutting it to fit the rounded corners of the trailer – it most likely became a Full. The doggy den is brilliant!!! Would LOVE to see pictures of that!
LikeLike
I adore this renovation. One of my favorites. Do you mind if I use a few pictures for my blog post about favorite RV renovations?
LikeLike
Absolutely!!! Thanks!!!
LikeLike
Gorgeous Niki! Great, great job Travis – the detail in your work is evident. You all put so much thought into it – what a marvelous family endeavor! I am so impressed. I love looking at the vintage trailers although I have a new one myself. Just too old to tackle a job like that but I sure appreciate the eye appeal. I did not see what make or year that Sylvia was born into. She is lovely – very nice. Lesley from Sisters On The Fly #7707
LikeLike
Wow, Lesley! Thank you so much for your kind words!!! Silvia is a 1988 Avion 34W:) Enjoy the journey!
LikeLike
So enjoyed looking through your beautiful renovation.Thankyou for the experience.
🌹 Kate
QLD Australia.
LikeLike
Thanks Kate!
LikeLike
Beautiful job! Love the master bed setup. Beautiful family too🙂
LikeLike
Thank you so much Shelley!
LikeLike
I adore your camper you did such a great job. I would love to know where you got the fabric for your bench. Is it leather? It’s perfect!
LikeLike
I’m so sorry I already asked you this and you responded Haha thank you so much for your time I swear my Momma brain is broken 🤣
LikeLiked by 1 person
Haha! No worries!
LikeLike
Hi Nikki
You have such good taste. Just wondering where you hot your Jackalope? I love them!
Cheers
Heather
LikeLike
Thanks so much Heather! We actually bought Leonard (our Jackalope) on Ebay.
LikeLike
Beautiful family and renovation.
LikeLike
Thanks so much, Donna!
LikeLike
I absolutely adore your camper and I have looked back at it many times for inspiration as I’m remodeling my own! I have searched high and low and I haven’t been able to find a upholstery fabric that makes the same statement that yours does on your bench. I would LOVE if you could tell me where you got it and exactly what it is!!
Thank you!!
LikeLike
Hi Mckensie! Thank you so much for loving Silvia and using her as your inspiration!!! I have been searching these last few days to try and find the place where we bought the faux leather but I can’t find it! I’ll keep looking though:)
LikeLike
You did a remarkable job. This is beautiful.
LikeLike
Thanks Dawn!
LikeLike
what is the pull out under the front bed, right above the drawers? Looks like a pull out table top or something.
LikeLike
Yes, it is a pullout table top. We used an 18″ hollow core door and drawer guides on the sides.
LikeLike
Nikki, you have impeccable taste! A beautiful family as well!
LikeLike
Oh wow! Thanks Day:)
LikeLike
Hi Niki! What a job well done!! My family and I just purchased a 1988 Avion 32S to Renovate (we are trailer twins!) and I had a few questions if you don’t mind me asking…We would like to replace the double mattresses as well – where did you get yours? Are they easy to obtain with the rounded corners? Also, our roof vent cover flew off during transport 😦 I am under the impression that they are not a standard size. Did you replace your vents/vent covers? If so, where did you get them? Anyways, thanks for the inspiration and for sharing!
LikeLike
Hi Michael,
Renovating these old trailers can be really exciting! The build quality of these Avions is hard to beat and they tow like a dream. For the beds there is a really simple solution, twin size memory foam mattresses purchased online. All you have to do is use the plywood under the mattress as a stencil and cut it out with an electric carving knife. I can’t remember where we purchased them, but I’m pretty sure they were around $100 each. As far as our roof vents go, we did not replace ours. The vent in the rear of the of the trailer is a “fantastic fan” that is the standard size (not sure if it is original or replacement). The vent in the front and bath however are original and something like 13.5 inches with rounded corners. I looked into replacing them just because and realized the size issue and decided they were good enough because they work. I’m sure that there is a replacement out there that would not require modifying the roof, but I didn’t look that far into it.
We hope you really guys enjoy the renovation process and make some great memories with your family when it’s finished. If you come across any other questions feel free to ask, we are happy to give any advice we can.
Less is more,
Travis & Niki
LikeLike
I would like to know where you got all your linens especially the curtains and the master bed.
Thank You,
Lena
LikeLike
Hi Lena! Most of our curtains were bought at a thrift store and the others my mom sewed with linen fabric. All the curtains were backed with white blackout material (really just heavy cotton fabric). The master bed is made up of a duvet cover I had had for years and the sheets + throw pillows were bought at a thrift store. They were both dyed in black bean dye. Not sure if that helps!
LikeLike
So lovely! Im from nz and doing my own little caravan up but yours is epic! Love your style. Your husband and you are very clever.
LikeLike
Thanks Janine! You are so sweet:) Good luck on your renovation!
LikeLike
Hello Niki!
I have been searching instagram hoping to see your travels but I can’t find you. Do you have a instagram? My IG is AirstreamLoving if you get or have a IG I would love to follow your ventures!! In love with your pictures, your Reno and your beautiful energy. Thank you!!!
LikeLike
Hi Hikia! Sorry about my Instagram account…I had changed my profile name and forgot to update it on my blog!!! Anyways, I’m under niki.livingless – thank you so much for your thoughtful words:) and good luck on your renovation!
LikeLike
Loved looking at your finished product! I clicked over because of the name, Silvia. I’m renovating an airstream we’ve named Sylvia as well! I hope to be finished and camping soon! Thanks for your beautiful pictures! They are very inspiring!
LikeLike
Thanks Heather! Good luck with your Silvia 😉
LikeLike
Wow! What a beautiful reno! And what a beautiful family. 🙂 We’re getting ready to reno our 2000 Georgie Boy Landau class A motorhome. Your lovely photos are quite the inspiration! I’m amazed at how the white paint brightens up the interior. It’s really stunning. The tiny bath in ours is practically identical to yours so I now know there’s hope for it, lol. Thanks so much for taking the time to post all these pics. I’ll certainly be referring to them as we go along. Safe and happy trails to you!
LikeLike
Thanks Dori for all of your sweet comments:) Silvia was sure a lot of work, but it was all worth it! Good luck – safe and happy trails to you too!
LikeLike
LOVE your camper redo! Hubby and I are in the midst of fixing/updating our 16′ 1972 (Midas) Smokey. It had major water damage in the back; that is all we’re tackling structurally, but the rest is getting a face lift. My questions have to do with your painting:
1. How did you apply your paint? Spray?
2. How’s the satin finish holding up? I was steering away from satin toward Semi-gloss…..
Very close to tackling the painting, so appreciate your advice. 😉
LikeLike
Hi Sandy! Thanks so much for commenting on Silvia! Glad you like what we’ve done:) I looked up your trailer model – pretty cool!!! Would love to see what you guys end up doing to it:)
To answer your questions about the paint: we did spray. We took off all of the cabinet doors and we painted them with a Wagner Power Sprayer or something like that – it was about $100 at Lowes. Travis went through and spray painted the entire trailer. He started off using Kilz, but it wasn’t necessary on the aluminum walls which has textured coating. However, I had to reapply several coats of paint to the cabinetry because brown kept seeping through. It was a pain in the rear:) I’d say he probably did 3 coats of paint and I probably added 2 coats on top of that to the cabinets…The Satin was my choice:) I still LOVE the overall look of it, but it has been difficult to clean…so the Semi-gloss would make it easier there.
Hope that answers your questions Sandy:) Good luck on your renovation!!!
LikeLike
Hello,
Great work! What brand of paint did you use. Was it indoor paint? I am having trouble with the paint peeling off. How did you prep the walls for paint?
LikeLike
Hi Lokus! We used Kilz before applying the actual paint we wanted. However, I had to reapply several coats of paint to the cabinetry because brown kept seeping through. It was a pain in the rear:) I’d say he probably did 3 coats of paint and I probably added 2 coats on top of that to the cabinets…The Satin was my choice:) I still LOVE the overall look of it, but it has been difficult to clean…so a Semi-gloss would make it easier there. Hope that answered your question! Good luck on your remodel:)
Niki
LikeLike
Thank you for the quick response. I have to peel off all the paint and try again with kilz. Is there a specific kilz that you used? I primed with BIN and painted with valspar. That was definitely a mistake. The humidity and temperature causes the paint to come off the avion walls like a sheet of paper. It’s a nightmare. At first it was really nice and then everywhere started bubbling up and peeling. The paint stuck well to the cabinets, but failed on all the aluminum/vinyl walls. Also, what did you do with the shower curtain?
LikeLike
I believe the Kilz was simply the “original” or “plain” Kilz – it was several years ago that we used it and we can’t remember if there was a specific one we used… Humidity is a stinker, that’s for sure! We dealt with that as well:( Now, the shower curtain was a process in itself and we had to make it ourselves. What we ended up doing was finding a curtain we liked and then cutting it into the curved shape and it turned out great!
LikeLike
Your trailer is gorgeous! I’m in the process of renovating a 1990 Avion 32S, and I have so much trailer envy right now! I just had to talk myself down from painting all of my cabinets white. It really brightens up the place, but I’m on a pretty short timeline to get mine done, so that might have to be a project for later. Would you mind telling me where you found the faucet for the tub? Beautiful job and tons of motivation to get mine livable and move in already!
LikeLike
Hey Jessica! Thanks for commenting on our lil’ Silvia – she’s pretty special:) The faucet is just a standard home unit. The hand held shower head is hung from a suction base that moves up and down (think we got it at Lowes), but has fallen a few times. Hope that helps! Let us know if there’s anything else we can help you with. Good luck!!!
LikeLike
I love what you did for the master bed to expand on a closet or storage space!! I have a 1963 Avion ( also in great shape ) and would like to do this with the dinette in the front . I have a sofa that pulls out into the bed across from the kitchen area. That could be used as the long dining table as you have yours . You wouldn’t happen to be in Texas wanting to do the cabinetry, would you !?! Lol! How deep do your drawers go ? I really love to know more about how this was done.
LikeLike
Hi Noelle! Wow, a 1963 Avion! I’d love to see pictures of it!!! Believe me, if we were in Texas we’d try to help you with your cabinetry…but we are in Oregon. Travis was trying to remember off the top of his head the depth of the drawers and he was thinking around 18″ or so. They are 3ft wide – so overall they are a decent size. We do have pictures showing the bones of the bed so if you are interested in seeing those, send me an email at livinglessblog@gmail.com (with any pics of your trailer;). Thanks for your comments Noelle!
LikeLike
Hi Niki! Thanks for the quick reply! I sent some pictures to your email of my Avion. And yes, I’d appreciate the photos of the bare bones of the bed. I think this idea would make my little honka monka better suit my needs 🙂
LikeLike
Hello! I’m so inspired by your renovations. You have such an eye for classic, beautiful design. My husband and I just started on our own RV Reno. I was just wondering what the timeframe was to get where you are today. Also, do you have any tips for updating the water/sewer systems? We’re debating whether it’s worth it to do on our own, or if we should take it to a professional. Thanks for any advice you may have. Excited to follow along!
LikeLike
Thanks so much for you kind comments! To answer your questions…it took us about 9 months to finish Silvia – BUT that was due to weather setbacks and us prepping/selling our home + working full-time jobs and Travis having to drive 45min to where Silvia was parked to do any work. It could’ve been done in a few months if we had the opportunity to give it our full attention. About the water/sewer system, we (meaning Travis) replaced all the waterlines with 1/2″ pex and replaced the water pump. We also replaced the water heater and all the faucets. If you are able to access the water lines, then absolutely do it yourself. Pex is extremely easy to work with. For the sewer – the “dumping valves” were replaced. One thing about the sensors on the tanks, we didn’t bother with them (due to the aluminum under our trailer which limits access), so our monitor panel doesn’t read properly. That’s one thing that’s wrong – but we dump the tank regularly so it doesn’t matter. Given access, it would be easy and cheap to replace them. That’s all Travis can think of right now. If you have any other questions PLEASE let us know! Best of luck! Will check periodically on your blog to see the progress you both are making!
LikeLike
Hi there! We are using your front bed platform as the inspiration for our RV bedroom. It’s such a smart design and a great way to great an oversized platform for the bedroom. Brilliant!
LikeLike
Hi Joanna! I am so excited to hear that you guys are inspired by us in your RV renovation!!! Would LOVE to see your finished product:) Thanks for you comment!
LikeLike
Hi there! We will be copying your design this week for our fifth wheel remodel! What is the exact color and sheen(like of the white paint you used throughout? I am desperate to know!
LikeLike
Hi Angie! I apologize for my delayed response to your comment. We had a very busy Christmas and I did not have a chance to get back to you about the paint color we used for Silvia. The color is Olympic Snow Storm (C30-2) satin. Thanks for your kind comments! We would LOVE to see what you guys are working on!
LikeLike
This is amazing! Well done guys it’s gorgeous! Any tips on where to start my own camping trailer project? Would like to cut renovate one from the inside out…
Diana
LikeLike
Thanks Diana! When it comes to trailer picking – definitely do your research. We planned on an Airstream but ended up with an Avion! Good bones is key when looking at older model trailers too. Oh, and being conscious of weight. Hope that helps! Thanks so much for your comment!
LikeLike
What a beautiful makeover! What a beautiful family!! I just purchased a 1971 Airstream Safari and I am so pumped to get her done! It will be spring before I can truly start working on her because we live in Ohio and of course weather is a huge issue. THANK YOU for your pictures I wanted more! MORE!! Lol
LikeLike
Hi Hikia! Thanks for your sweet words about Silvia – we are pretty fond of her too:) How exciting that you have a trailer project. Please don’t hesitate to ask ANY questions during your renovation – my husband will most likely have an answer for you. Thanks for comment!
LikeLike
Wow, this looks amazing! We also own an avion that we refurbished. Have to say I’m loving your new front layout. We’ve been wrestling with the best way to work our space now that we have kids (didn’t when we finished our remodel) and I really like your setup. Very nice job, the old girl looks fantastic!
LikeLike
That is so sweet Jenn! Thanks! Kids definitely change the dynamic of things, don’t they? Would love to see what you guys come up with!
LikeLike
It really looks fantastic! I will be using your camper as inspiration when we finally get our own to redo. I love everything about everything you did! Great job. 🙂
LikeLike
Wow, thanks Jamie! It’s wonderful to hear that you’ll be thinking of Silvia during your future renovation! Excited for you guys:) Please send me pictures of your trailer when you are all finished. Would LOVE to see them!
LikeLike
This is amazing! I could easily live in this full time – beautiful and functional!
LikeLike
Thank you so much Michelle! Glad you like it:)
LikeLike
This is beautiful! I have many questions, but for now where did you get your lovely white curtains? Very nice. I have a 1981 34V Avion travel trailer. I must show my husband your Silvia. Thank you for the inspiration!
LikeLike
Hi Renee! Thank you for your kind remarks! To answer your question about the curtains – the ones in the kiddos room and the ones in our eating area I purchased from a thrift store. All of the other curtains my mom did with linen fabric I had purchased. All of the curtains were lined with a sort of “blackout” fabric. LOVE meeting another Avion owner! We love ours and hope you do too! Thanks for stopping by!
LikeLike
You both have done such a great job building your home, we are so proud of both of you. The picture of your family at your door way is great.. We LOVE all four of you… G P Don
LikeLike
Hey Nik its Whitney…. I really love what you did on this page, your house looks amazing you and Travis did such an amazing job. You have an great skill, and you are a awesome photographer and a great mommy, keep doing you your amazing. Love you heaps
LikeLike
Hey, thanks Sis! That means a lot. Love you too
LikeLike